Ever dreamt of an architectural marvel dominating your Minecraft landscape? Something both breathtakingly complex and strangely efficient? Then you've likely envisioned a geodesic dome. Far from just a fancy sphere, Geodesic Dome Construction in Minecraft offers a unique blend of challenge, creativity, and impressive results. It's a build that elevates your world from good to truly epic.
Imagine crafting a structure that feels futuristic, yet grounds itself in mathematical precision. A transparent bubble city, a colossal mob farm enclosure, or the ultimate display case for your rarest items – geodesic domes bring a whole new dimension to your blocky canvas. This guide isn't just about how to build one; it's about understanding the magic behind them and equipping you with the schematics and knowledge to make it happen, easily and enjoyably.
At a Glance: What You'll Discover
- Why geodesic domes are more than just pretty shapes in Minecraft.
- The fundamental principles that make domes strong and efficient.
- How to tackle construction, whether you prefer hand-crafting or automation.
- The power of schematics and online generators for rapid, precise building.
- Practical tips for designing interiors and integrating your dome into your world.
- Answers to common questions and troubleshooting for a smooth building experience.
Why a Geodesic Dome Deserves a Spot in Your Minecraft World
Let's be honest, building square houses gets old. While rectangular prisms are practical, they rarely inspire awe. Geodesic domes, on the other hand, immediately stand out. They offer a unique aesthetic that complements both modern and fantastical builds.
Beyond pure aesthetics, these structures bring tangible benefits to your gameplay:
- Massive Interior Space: Domes enclose a surprisingly large volume relative to their surface area, making them ideal for sprawling farms, intricate redstone contraptions, or even entire mini-cities.
- Structural Integrity (Visually): While Minecraft doesn't obey real-world physics, a geodesic dome looks incredibly strong and stable, a testament to its real-world design principles. This visual strength adds gravitas to your base.
- Natural Lighting: Build one out of glass, and you have an incredible, naturally lit space that feels open and connected to the environment, even while being enclosed.
- Bragging Rights: Successfully constructing a geodesic dome is a significant achievement. It demonstrates skill, patience, and a keen eye for detail—especially if you're building a large one.
The Geodesic Advantage: A Quick Primer for Builders
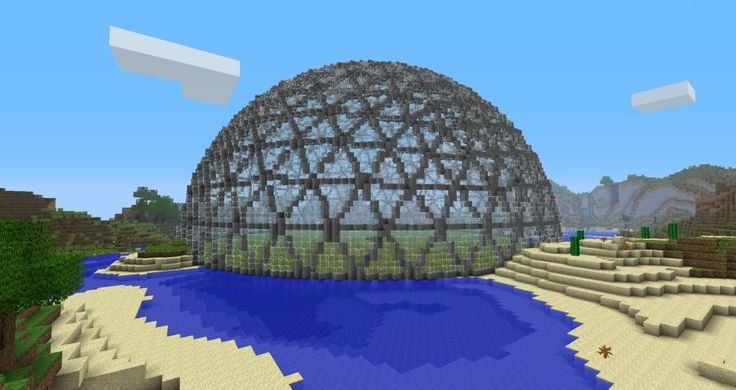
Before we dive into laying blocks, a tiny bit of background helps. A geodesic dome isn't just a sphere; it's a spherical shell made of interconnected triangles. These triangles distribute stress evenly across the structure, giving them incredible strength in the real world. Think of Buckminster Fuller's iconic designs.
In Minecraft, this translates to:
- Approximation: Since Minecraft uses blocks, we can't make perfect curves. Geodesic domes in Minecraft are approximations using straight edges to form triangles, which then tessellate across a spherical shape.
- Efficiency: Because they approximate a sphere, they offer the most interior volume for the least amount of surface material compared to a cube or pyramid of similar footprint. This means fewer blocks for more enclosed space.
- Scalability: You can build small domes or truly massive ones just by changing the "frequency" (more on this below).
This mathematical elegance is what makes them so appealing. You're not just stacking blocks; you're echoing a profound design principle.
Understanding Dome Frequencies: Your Blueprint to Detail
When discussing geodesic domes, you'll often hear about "frequencies," like V1, V2, V3, and so on. This isn't about sound waves; it's about the level of detail and granularity in your dome's curvature.
- V1 (Frequency 1): This is the simplest and smallest geodesic dome. It uses very few, large triangles, resulting in a somewhat angular, less spherical shape. Think of it as a low-polygon sphere. It's quick to build and good for small features or learning the ropes.
- V2 (Frequency 2): This is where most builders start. V2 domes use more, smaller triangles than V1, creating a smoother, more recognizably spherical shape. They offer a good balance between size, block count, and aesthetic appeal. Many impressive domes you see online are V2 or V3.
- V3 (Frequency 3) and Higher: As the frequency increases, the number of triangles grows exponentially, making the dome progressively smoother and more spherical. A V3 dome is significantly larger and uses many more blocks than a V2, but the curvature is much more pleasing to the eye. For truly colossal projects, you might even venture into V4 or V5, but be prepared for a massive undertaking.
Why does this matter? Your chosen frequency dictates: - Size: Higher frequency means a larger dome for a given radius.
- Block Count: Exponentially more blocks for higher frequencies.
- Smoothness: Smoother curves with higher frequencies.
- Complexity: More intricate patterns and connections with higher frequencies.
For a first-time builder, a V2 dome is often the sweet spot. It's challenging enough to be rewarding, but not so overwhelming that it becomes a chore.
Manual Construction: The Patient Builder's Path
Some purists swear by hand-placing every block. It's a meditative process for some, and undeniably satisfying. However, for a geodesic dome, it requires meticulous planning and a lot of time. As one Reddit builder noted, their large dome consisted of "8000 blocks. Glad I didn't have to hand place them." That sentiment perfectly captures the scale of manual construction.
If you choose this path, here’s how to approach it:
1. The Blueprint is Everything
You cannot freehand a geodesic dome. You need a precise blueprint.
- Online Generators: Many websites allow you to input a radius and frequency, then output a 2D cross-section or even a layer-by-layer guide. These are invaluable.
- Minecraft Schematics (as Guides): Even if you're building manually, you can download a schematic of a dome (more on these later) and use it as a visual reference, layer by layer, in a creative test world.
- Graph Paper: For smaller domes, old-fashioned graph paper can help you map out your layers and block placements.
Focus on the base layer first, ensuring it's perfectly symmetrical and correctly sized according to your chosen frequency.
2. Identifying Key Shapes: Triangles and Edges
A geodesic dome is built from two primary types of triangular faces, which connect to form a larger pattern. These faces are usually made of two different edge lengths (for a V2 dome).
- Struts: In Minecraft, these are the lines of blocks forming the edges of your triangles. You'll have two main strut lengths.
- Vertices: These are the points where multiple struts meet, forming either a pentagonal (5 struts) or hexagonal (6 struts) arrangement if viewed from the outside.
Your blueprint will indicate these strut lengths. Pay close attention to them! One miscounted block can throw off the entire dome's symmetry.
3. Step-by-Step Manual Building (Conceptual)
- Mark the Center: Place a temporary block at the exact center of your desired dome footprint.
- Layout the Base: Using your blueprint, lay out the bottommost ring of your dome. This is often a dodecagon (12-sided polygon) or a larger, more complex shape depending on your frequency. Ensure symmetry.
- Build the First Layer of Struts: Extend blocks upwards from the base according to the strut lengths indicated in your plan. You'll be forming the edges of your first set of triangles.
- Connect Vertices: Where the struts from different base points meet, connect them to form the vertices. This is where the pentagonal and hexagonal patterns emerge.
- Fill in the Triangles (Optional): Once the framework is up, you can fill in the triangular faces with your chosen material (e.g., glass, solid blocks).
- Repeat Layers: Work your way up, layer by layer, following your blueprint precisely. Each layer will gradually reduce in circumference until you reach the apex.
Pitfalls of Manual Construction:
- Tedium: The sheer repetition can be draining.
- Error Propagation: A mistake in a lower layer will compound, making subsequent layers incorrect.
- Time Commitment: Expect days, if not weeks, for larger domes.
Automated Construction: Schematics, Generators, and WorldEdit
For most players aiming for a medium to large geodesic dome, automation is your best friend. It offers precision, speed, and takes the monumental block-counting task off your shoulders. This is where tools like WorldEdit and online generators truly shine, as highlighted by the Reddit user who built an 8000-block dome and was "glad I didn't have to hand place them."
1. The Power of Schematics
A schematic is essentially a blueprint file (.schem or .schematic) that stores a 3D selection of blocks. Think of it as a digital copy-paste function for large builds. With a schematic, you can instantly paste a perfectly formed geodesic dome into your world.
- Speed: What might take days manually takes seconds with a schematic.
- Precision: No miscounts, no asymmetry. The dome is mathematically perfect.
- Reusability: Build it once, save it, and paste it anywhere.
- Customization: Many schematics can be customized for material and size before generation.
2. Finding and Using Pre-built Schematics
A quick search online will reveal numerous pre-built geodesic dome schematics for Minecraft. These are often shared by talented builders and can be a great starting point.
How to use them (requires WorldEdit or similar mod/plugin):
- Install WorldEdit: This is a crucial client-side mod or server plugin that allows you to manipulate large selections of blocks.
- Download the Schematic: Save the
.schemor.schematicfile to your WorldEdit schematics folder (usually/.minecraft/config/worldedit/schematicsfor client-side, or~/plugins/worldedit/schematicsfor server-side). - Load the Schematic in-game:
//schem load [schematic_name](e.g.,//schem load v2_glass_dome)
- Position the Schematic: Use
//pasteto place it. You can adjust its placement relative to your current position.
//paste(pastes directly)//paste -a(pastes without air blocks, useful for overlays)//rotate <degrees>(e.g.,//rotate 90)//flip//set <block>(if you want to change the material after pasting)
Remember to stand where you want the bottom-center of your dome to be when you paste it.
3. Online Dome Generators: Your Custom Dome on Demand
This is arguably the most powerful method. Online tools and programs like the one referenced on GitHub (Drus008/MinecraftGeodesicDome) allow you to specify exact parameters for your dome and then generate a schematic file tailored to your needs.
How they work (general concept):
- Input Parameters: You typically provide:
- Radius: How wide your dome will be.
- Frequency (V1, V2, V3+): The level of detail and smoothness.
- Block Material: Specify the block ID or name for the dome's structure (e.g.,
minecraft:glass,minecraft:polished_andesite). - Half Dome/Full Dome: Do you want a complete sphere or just the upper half?
- Inverted: Some generators can create "inverted" domes.
- Hollow/Solid: Whether the dome is just a shell or filled entirely.
- Generation: The tool calculates all the block positions based on geodesic math.
- Output: It generates a
.schemor.schematicfile ready for download.
Once you have this custom schematic, you follow the same steps as above to load and paste it using WorldEdit. This method gives you ultimate control and ensures your dome is unique to your vision. Build your Minecraft domes with these powerful online tools, custom-tailoring every aspect from size to material.
4. WorldEdit Essentials for Dome Builders
Beyond pasting, WorldEdit offers a suite of commands that can enhance your dome construction:
//wand: Gives you the WorldEdit selection wand (default: wooden axe).//pos1///pos2: Sets the two corners of your selection.//set <block>: Fills your selection with a specified block. Useful for clearing out the interior after pasting or quickly replacing materials.//replace <old_block> <new_block>: Changes all instances of one block type to another within your selection. Perfect for experimenting with different dome materials.//undo: Crucial for fixing mistakes! Don't be afraid to use it.//cut///copy: If you build a section manually and want to duplicate it.
Mastering these commands transforms WorldEdit from a simple pasting tool into a robust architectural assistant.
Pro Tip: Experimenting with Materials
The material you choose dramatically impacts the dome's appearance and function.
- Glass: Classic, allows for stunning natural light and views. Good for bases, observation decks, or biodomes. Consider different colors of stained glass.
- Concrete/Terracotta: Opaque, offers a strong, modern aesthetic. Great for secure bases or building within the dome.
- Wood/Stone Bricks: More rustic, can blend well with natural environments or traditional builds.
- Glowstone/Sea Lanterns: Integrate lighting directly into the dome's structure for a sci-fi look and to prevent mob spawns.
- Combinations: Don't be afraid to mix! A concrete base with a glass upper half, or alternating opaque and transparent triangles, can create beautiful patterns.
Designing Your Dome's Interior and Function
A hollow shell is just a shell. The real fun begins when you transform it into a functional and inviting space.
1. Beyond the Shell: Floors, Multi-levels, and Lighting
- Flooring: Decide on a central floor material. Consider patterns or raised platforms.
- Multi-Level Living: Domes naturally lend themselves to multiple floors. Use pillars or floating platforms to create different levels for living quarters, storage, or farms. Staircases or elevators can connect them.
- Lighting: Natural light from glass domes is beautiful, but you'll need artificial light for darker areas and nighttime. Hide light sources behind decorative blocks, use glowstone integrated into the floor, or string lights along the dome's interior struts.
2. Practical Uses for Your Dome:
- Main Base: A grand, central base for all your operations.
- Agricultural Hub: Enclose vast farms for crops, trees, or even animal pens. The spacious interior is perfect.
- Mob Farm/Grinder: The enclosed nature makes it ideal for controlling mob spawns and creating efficient grinders.
- Display Hall: Showcase your rare items, trophies, or intricate redstone creations in a dedicated space.
- Portal Hub: A central, visually impressive hub for all your Nether and End portals.
- City Centerpiece: If you're building a larger city, a grand dome can serve as the capital building or a central market.
3. Integrating Seamlessly with the Landscape
A dome plopped down haphazardly can look out of place. Consider:
- Terrain Modification: Terraforming the area around your dome to create smooth transitions, pathways, or even a moat.
- Underground Integration: Build the lower half of your dome underground, with only the top half exposed, creating a secret base feel.
- Connected Structures: Build walkways, tunnels, or smaller satellite structures that branch off from the main dome.
- Water Features: Surround your dome with water, or incorporate internal water features for aesthetics and utility.
Common Questions & Troubleshooting for Dome Builders
Let's address some frequent queries and potential headaches:
"How many blocks will a geodesic dome take?"
It vastly depends on its size (radius) and frequency. A small V1 dome might be a few hundred blocks, while a large V3 dome can be tens of thousands. The 8000-block Reddit example was a significant build. Use online generators to get an exact block count before you commit, especially in Survival mode.
"Can I build one in Survival Mode?"
Absolutely! It's a huge challenge, but incredibly rewarding.
- Plan meticulously: Get a block count from a generator and start gathering resources.
- Start small: A V2 dome is a good starting point.
- Use scaffolding: Make sure you have plenty of temporary blocks (dirt, sand, cobblestone) for scaffolding.
- Elytra and rockets: Essential for large, high-up builds for quick navigation.
- Be patient: It will take a long time. Break it into manageable sections.
"My dome looks wonky after pasting it with WorldEdit!" - Check your position: WorldEdit pastes relative to where you are standing. Make sure you're at the correct bottom-center point.
- Check for conflicting blocks: If you used
//paste -a(paste without air), existing blocks in your world might interfere with the schematic. Consider clearing the area first with//set air. - Verify schematic integrity: If you downloaded it, ensure the schematic file itself isn't corrupted or incomplete. If you generated it, double-check your input parameters.
"What's the best frequency for a first-timer?"
A V2 dome is generally recommended. It provides a good balance of spherical aesthetics without an overwhelming block count. It's complex enough to feel like a real achievement but not so massive that it becomes a multi-month project.
"How do I make the interior look good if it's curved?"
Embrace the curve! - Circular/Hexagonal Platforms: Build your floors as concentric circles or hexagons, matching the dome's geometry.
- Wall Sections: Use short, straight wall sections that follow the dome's curve.
- Furniture Placement: Place furniture (beds, chests, crafting stations) in the flatter central areas or against slightly curved walls.
- Use the Height: Leverage the dome's height for multi-story designs, observation decks, or even internal gardens.
Your Next Epic Build: A Dome of Your Own
Geodesic dome construction in Minecraft isn't just about following steps; it's about pushing the boundaries of your creativity and learning new building techniques. Whether you choose the patient, block-by-block method or embrace the power of schematics and generators, the end result is always a testament to ingenuity and vision.
Now that you understand the principles, the tools, and the immense potential, it's time to gather your materials, fire up your WorldEdit commands, or simply start clicking away. Go forth and build something truly extraordinary. Your Minecraft world awaits its new, magnificent centerpiece.