When you envision your dream Minecraft base, chances are a towering, elegant dome features prominently. These magnificent structures, from their humble origins as simple shelters to their current status as architectural marvels, represent both a triumph of engineering and a beacon of protection. But anyone who’s tackled the ambition of Optimizing Large-Scale Minecraft Dome Builds knows that scale comes with unique challenges. A truly impressive dome isn't just about placing blocks; it's about precision, resource management, and a deep understanding of geometry, often far beyond what's intuitive in a blocky world.
This isn't just a guide; it’s your masterclass in elevating your dome-building prowess from good to legendary, leveraging smart tools and strategies that streamline the entire process. Forget endless manual counting and frustrating symmetry errors. We're going to equip you with the knowledge to build massive, breathtaking domes that stand as testaments to your Minecraft skill.
At a Glance: Crafting Your Perfect Minecraft Dome
- Embrace Digital Design: Learn why online dome generators are indispensable for large-scale projects, ensuring perfect symmetry and accurate material lists.
- Plan with Purpose: Understand how your dome's function (e.g., greenhouse, observatory, secure base) dictates its design, materials, and placement.
- Master Material Management: Calculate precisely what you'll need, from glass blocks and frames to essential decorative elements, avoiding costly overages or shortages.
- Strategize Placement: Discover optimal locations for your dome, considering terrain, mob protection, and integration into your larger base.
- Beyond the Blueprint: Explore advanced techniques for interior design, exterior detailing, and integrating functional elements like lighting and Redstone.
- Sidestep Common Pitfalls: Identify and avoid typical mistakes that can derail large-scale builds, saving you time and frustration.
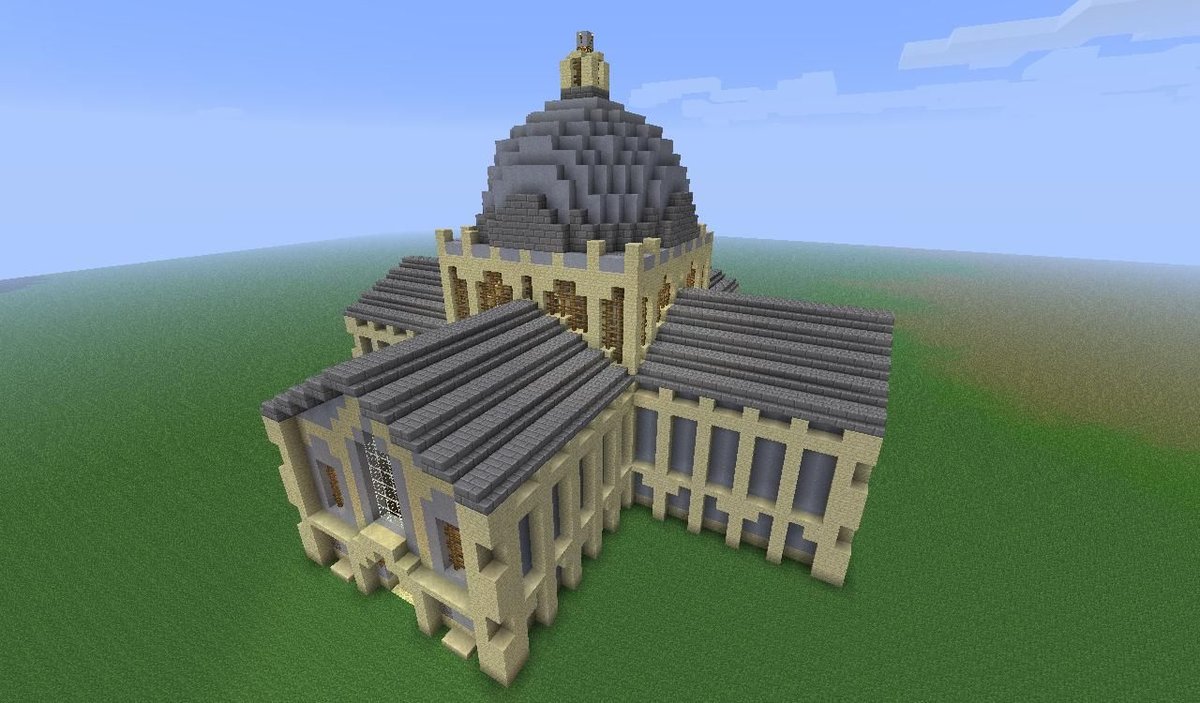
The Enduring Allure of the Minecraft Dome
Since its inception in 2009 by Markus "Notch" Persson, Minecraft has empowered millions of players to build anything they can imagine, one block at a time. Among the myriad structures possible, the dome holds a special place. It’s an iconic shape, offering aesthetic appeal, practical utility, and a unique architectural challenge. A well-built dome can serve as a stunning greenhouse, a panoramic observatory, a secure and spacious home, or even a protective shield for an entire settlement, particularly useful near water where hostile mobs can be a constant threat.
Historically, basic domes might have been constructed from humble sandstone or hardened clay, but for the true spectacle, glass blocks are the material of choice. Whether you opt for a pristine glass shell or a robust stone exterior, the fundamental principles of building a structurally sound, visually appealing dome remain constant. The key, especially for large-scale projects, lies in meticulous planning and leveraging the right tools.
The Sisyphus Syndrome: Why Large Domes Are So Challenging
Building a small, five-block-high dome for basic mob protection might seem straightforward. You dig an area, place some slabs, and call it a day. But scale that up to a structure 50 blocks wide, 50 blocks high, and 50 blocks deep – that's 10,000 blocks! – and the complexity skyrockets.
Here’s where most ambitious builders hit a wall:
- Symmetry is a Beast: Achieving a perfectly symmetrical curve or sphere in a block-based game without precise calculations is almost impossible. A single misplaced block can throw off an entire section, leading to frustrating rebuilds.
- Material Math Meltdown: How many glass blocks do you need? How many iron blocks for the frame? Manually counting thousands of blocks across multiple layers is tedious, prone to error, and a massive time sink. Miscalculating leads to either endless trips back to your storage or excessive, wasted resources.
- Layering Logistics: Domes are built layer by layer. Knowing which blocks go where on each concentric ring requires a blueprint, not just guesswork.
- Time and Tedium: Without a clear plan, large-scale builds become a test of endurance rather than creativity. The joy of building can quickly turn into a monotonous chore.
This is precisely why optimizing your large-scale Minecraft dome builds isn't just about being efficient; it’s about making the process enjoyable and ensuring your grand vision translates flawlessly into the game.
Your Architect's Secret Weapon: Online Design Tools
In the quest for perfect symmetry and efficient resource management, online Minecraft dome generators and calculators have become indispensable. These aren't cheats; they're sophisticated engineering aids that leverage algorithms to translate your desired dimensions into precise, block-by-block instructions for vanilla Minecraft builds.
How Dome Generators Revolutionize Your Build
Imagine being able to input the exact width, height, and depth of your desired dome. With a few clicks, these tools can:
- Generate Precise Blueprints: They outline the exact placement of every block, layer by layer, ensuring flawless symmetry and shape. No more guessing, no more manual counting, and certainly no more wonky curves.
- Provide Accurate Material Lists: These tools calculate the precise number of glass blocks, iron frames, or any other primary material you intend to use. This means you gather exactly what you need, minimizing waste and resource runs.
- Handle Immense Scale: Many of these generators can manage designs up to impressive dimensions, typically around 50 blocks wide, 50 blocks high, and 50 blocks deep – that's a monumental structure made of up to 10,000 individual blocks.
These generators serve as your digital architect, turning abstract ideas into actionable plans. Instead of spending hours calculating and recalculating, you spend minutes generating, then focus your in-game time on building. For any serious builder looking to create truly awe-inspiring structures, delving into these tools is a game-changer. To get started and see these powerful tools in action, you can explore Minecraft dome generation and experiment with your own dimensions.
Clarifying "Glass Dome" Items vs. Building Domes
It's worth noting that while this article focuses on the process of building large-scale domes block by block, some Minecraft mods or specific game versions might introduce an in-game "Glass Dome" item. The ground truth mentions an item with 12 sides, customizable colors, obtainable by specific inventory manipulation with a sandstone block. This item provides a pre-fabricated structure. While convenient for quick placement, it often lacks the customization and scale potential of a meticulously planned, block-by-block build. Our focus here is on crafting those grand, custom structures that truly reflect your unique design vision, using external tools to streamline that complex process.
Planning Your Optimized Dome Build: A Step-by-Step Guide
Optimizing begins long before you place your first block. It starts with a clear vision and a strategic plan.
Step 1: Define Your Vision and Purpose
What is your dome for? This fundamental question guides every subsequent decision.
- Greenhouse: Prioritize light, open space, and easy access for farming. Glass will be dominant, perhaps with a sturdy base.
- Observatory: Maximize the view. A high-altitude placement and a fully transparent roof are key.
- Secure Base/Home: Focus on defense, interior layout, and material strength. You might opt for a stone or reinforced glass base with internal subdivisions.
- Decorative Landmark: Pure aesthetics. Focus on intricate framing, unique material combinations, and dramatic lighting.
Your purpose will influence your chosen materials, the required size, and even the internal layout, so think about it deeply before moving on.
Step 2: Location, Location, Location
Choosing the right spot is crucial for both aesthetics and functionality.
- Elevation is Key: Aim for a location at least 3 blocks above ground. This offers better visibility, prevents ground-level mob spawns within the immediate perimeter, and provides a cleaner base for construction. Building on uneven terrain without proper leveling can lead to a lopsided base or require extensive terraforming, costing valuable time.
- Mob Protection (Especially Near Water): Domes excel at protecting settlements. If your base is near a body of water, which is often a source of hostile mobs, placing a dome over key areas provides an essential layer of security. Consider proximity to resources too – you don't want to travel far for every block.
- Integration with Existing Builds: Will your dome stand alone, or will it connect to an existing base? Plan entry points, tunnels, or bridges to ensure seamless integration.
Step 3: Sketching Initial Dimensions (The Rough Draft)
Before hitting the generator, have a general idea of your dome's desired size. Consider:
- Width (Diameter): How broad should the base be?
- Height: How tall will it reach? Remember, a basic structure needs at least five blocks in height to offer effective mob protection.
- Depth: For truly spherical or elongated domes, this might differ from the width.
Keep in mind that most online generators have a practical limit, often around 50 blocks in any dimension (width, height, depth). This is ample for truly grand structures, accommodating up to 10,000 blocks in total for a 50x50x50 build. Pushing beyond this typically requires combining multiple generated sections or using more advanced, less common tools.
Step 4: Leveraging Design Tools for Precision
This is where the magic happens. Head to your chosen online dome generator.
- Input Your Dimensions: Carefully enter the width, height, and depth you decided on in Step 3. Some generators offer options for different dome shapes (hemisphere, ellipsoid, etc.) – choose one that matches your vision.
- Review the Output: The generator will process your request and provide a blueprint. This typically includes:
- Layer-by-layer schematics: Visual representations, often in a top-down view or even 3D, showing exactly where each block goes on every elevation.
- Block count summary: A precise list of how many of each block type (e.g., glass, air, frame material) you'll need.
- Save Your Blueprint: Download the schematic, save screenshots, or print the block list. This is your bible for the build.
Step 5: Materializing Your Dome
With a precise blueprint in hand, resource management becomes straightforward.
Choosing Your Blocks Wisely
Beyond just glass, consider the role of different materials:
- Glass Blocks vs. Glass Panes: Glass Blocks offer a solid, uninterrupted appearance, while Glass Panes are thinner and can be used for more intricate details or to save on resources.
- Frame Materials: Iron blocks, typically for a robust, industrial look, are explicitly mentioned in the ground truth as a framing material. However, wood planks, cobblestone, smooth stone brick, or even polished blackstone can create vastly different aesthetic frames. Smooth stone brick/slabs are a great choice for alternative aesthetics or increased protection. Hardened clay and sandstone are also good options for basic structures.
- Decorative Elements: Beyond the core structure, plan for internal and external decorative blocks that enhance your dome's purpose.
Calculating Supply and Gathering Resources
Using your generator's block count, you can now:
- Gather Exact Quantities: Aim to collect slightly more than the calculated amount (a 5-10% buffer) to account for accidental breakages or minor design tweaks.
- Efficient Resource Gathering:
- Glass: Smelt sand efficiently. Consider setting up a desert base or an automated sand farm.
- Iron: Build an iron farm for large-scale frame needs.
- Stone/Wood: Set up automated tree farms or stone generators for consistent supply.
- Villager Trades: For specific blocks or large quantities, trade with villagers.
Beyond Basic Structure: Aesthetics and Functionality
An optimized dome isn't just structurally sound; it's beautiful and serves its intended purpose effectively.
Interior Design: Making the Most of the Space
The vast, open space of a large dome offers incredible interior design opportunities:
- Multi-level Platforms: Create balconies, mezzanines, or observation decks within your dome.
- Specialized Zones: Divide the space into distinct areas for farming, storage, crafting, or living quarters. A glass dome is excellent for an outdoor garden that is protected from the elements and mobs.
- Lighting Solutions: Effective lighting is crucial. Torches prevent mob spawns, but consider more aesthetic options like sea lanterns, glowstone, or strategically placed redstone lamps to illuminate your interior without clutter.
Exterior Framing and Detail: Adding Character
The external appearance of your dome can be just as important as the interior:
- Frame Embellishment: If you're using a visible frame, consider adding decorative elements like stairs, slabs, or even different colored blocks to create patterns and visual interest.
- Entrances and Exits: Design grand entrances with archways or integrated tunnels that flow seamlessly into your base.
- Landscaping: Integrate your dome into the surrounding terrain with custom landscaping, paths, and water features.
Advanced Functionality: Redstone Integration
For the truly ambitious, a dome can become a hub for Redstone contraptions:
- Automated Doors: Concealed entrances or airlocks for security.
- Lighting Systems: Day-night cycle lighting, or mood lighting for different sections.
- Farms and Greenhouses: Automated crop harvesting systems for your internal gardens.
Common Pitfalls and How to Avoid Them
Even with the best tools, large-scale projects can run into issues. Here's how to anticipate and prevent them:
- The "Run Out of Materials" Disaster: This is the most common and easily avoided pitfall. Always have your material list handy, and always over-collect slightly. Nothing kills momentum like pausing a build to go mining for hours.
- Ignoring the Terrain: Starting a large build on an uneven surface without preparation will lead to a lopsided base, require extensive leveling midway through, or force a complete restart. Flatten your chosen area thoroughly before placing any structural blocks.
- Not Enough Height for Protection: A basic dome needs at least five blocks of internal height to prevent most hostile mobs from spawning or jumping in. If your dome is lower than this, it sacrifices its primary protective function.
- The Over-Scoping Trap: While online generators can handle massive domes, don't bite off more than you can chew if you're building solo or with a small team. Start with a moderately large dome to get a feel for the process before tackling a truly colossal one. Loss of motivation is a real threat to overly ambitious projects.
- Symmetry Errors (Manual Builds): For those stubborn enough to build without generators (or for small tweaks), double-check your symmetry frequently. Step back and view your work from multiple angles. Even a single block misplaced early on can propagate into a significant flaw.
Your Next Optimized Masterpiece Awaits
Optimizing large-scale Minecraft dome builds is about smart planning, strategic execution, and, most importantly, leveraging the powerful design tools available to you. Gone are the days of endless block counting and frustrating symmetry errors. With an online generator as your guide, a clear vision, and a well-stocked inventory, you're not just building a dome; you're crafting a testament to your creativity and engineering prowess in the vast world of Minecraft.
So, gather your resources, fire up your chosen generator, and embark on your next grand architectural adventure. The perfect, symmetrical, and awe-inspiring dome you've always dreamed of is now within your reach. Happy building!